Introduction
This tutorial demonstrates how to integrate Bluetooth-enabled lights into Apple’s HomeKit ecosystem. The following mobile apps are supported:
- LampSmart Pro
- Lamp Smart Pro - Soft Lighting / Smart Lighting
- FanLamp Pro
- Zhi Jia
- Zhi Guang
- ApplianceSmart
- Vmax smart
- Zhi Mei Deng Kong
By following this guide, you’ll be able to control your Bluetooth light through the iPhone Home app and Siri voice commands. For a demonstration of the final implementation, refer to my companion post: Journal: Integrate Bluetooth Lamp into HomeKit.
This implementation is based on the open-source project ha-ble-adv.
Prerequisites
Before proceeding, ensure you have:
- Basic understanding of Home Assistant concepts and operations
- Terminal command-line proficiency
- Docker installation
- GitHub account
- Required Hardware: ESP32 development board
- Primary function: Bluetooth communication
Implementation Overview
This tutorial uses MacOS as the reference environment. Linux and Windows users may need to adjust certain steps accordingly. Each section includes:
- Implementation steps
- Verification procedures
- Troubleshooting guidelines (where applicable)
Implementation Details
If you’re not interested in the technical details, you can skip to Part 1
Component List
- Home Assistant (HA)
- Home Assistant Community Store (HACS)
- ha-ble-adv
- Home Assistant Bluetooth Low Energy Advertise
- ESP Home
- esphome-ble-adv-proxy
- ESP32
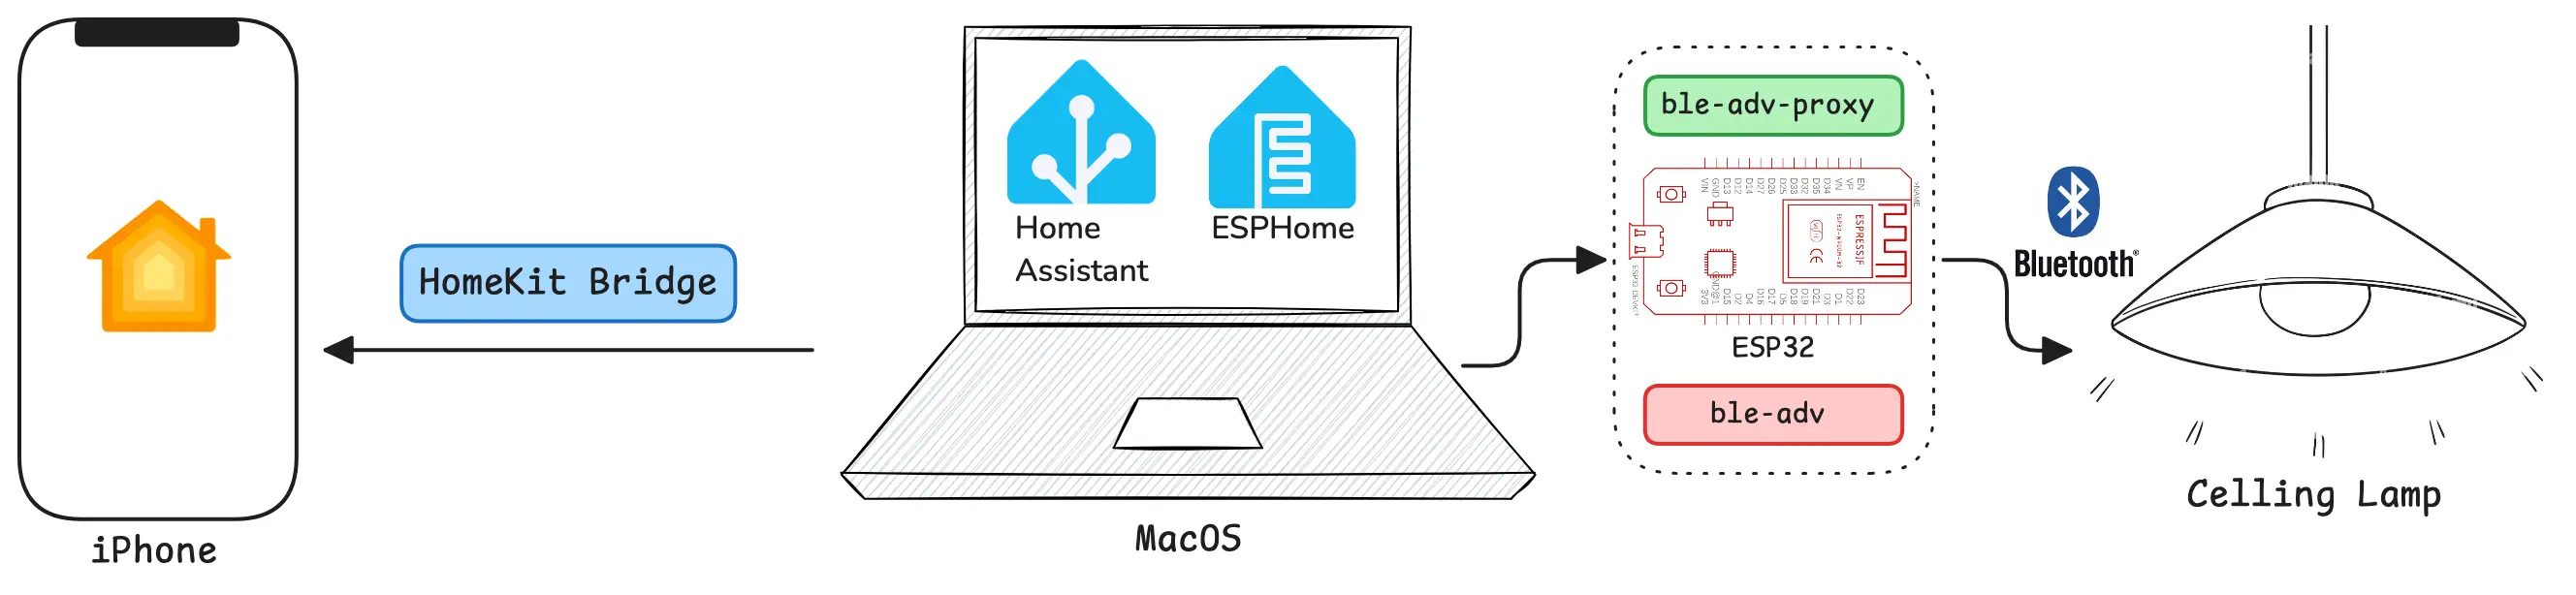
System Architecture
- Core functionality:
ha-ble-advhandles Bluetooth communication for device control - HomeKit integration: Achieved through Home Assistant’s HomeKit Bridge
- Implementation requirements:
ha-ble-advcomponent installation viaHACSesphome-ble-adv-proxydeployment on ESP32 through ESP Home
System architecture diagram:
Let’s get started. Based on the implementation above, for tutorial continuity, we’ll begin with the ESP32.
First, create a directory to store all components we’ll use:
$ mkdir Home-Assistant
$ cd Home-Assistant
Part 1: ESP Home
Installing ESP Home
Implementation Steps
Install ESP Home using Docker. For alternative installation methods, refer to the official documentation.
Configuration
- Create a Docker Compose configuration:
# Home-Assistant/docker-compose.yml
services:
  esphome:
    container_name: esphome
    image: ghcr.io/esphome/esphome
    volumes:
      - ./esphome/config:/config
      - /etc/localtime:/etc/localtime:ro
    restart: always
    privileged: true
    network_mode: host
- Deploy the service:
$ docker compose up -d
Verification
Access the ESP Home dashboard at http://localhost:6052.
For installation issues, refer to the official documentation.
ESP32 Device Integration
Implementation Steps
Configure ESP32 in ESP Home for device management.
Configuration
- Connect ESP32 to MacOS via USB
- In the ESP Home dashboard:
- Add new device
- Set device name (e.g.,
esp32-ble-adv-proxy) - Select ESP32’s serial port
- Configure Wi-Fi credentials
- Important: Use 2.4GHz Wi-Fi network
- Begin installation:
- Select “Plug into this computer”
- Wait for installation completion (minimum 2 minutes)
Verification
- Installation completion prompt appears
- Device status shows as ONLINE in dashboard
- View device logs through LOGS interface
Troubleshooting
- Installation timeout:
- Wait minimum 2 minutes
- Monitor installation progress
- Device offline:
- Verify Wi-Fi credentials
- Confirm 2.4GHz network connection
Installing esphome-ble-adv-proxy
Implementation Steps
Deploy the community component esphome-ble_adv_proxy on the ESP32 device.
For detailed instructions, visit esphome-ble_adv_proxy.
Configuration
- In ESP Home dashboard, select the
esp32-ble-adv-proxydevice - Update configuration:
(...)

esp32:
  board: esp32dev # Or your specific board model
  framework:
    type: esp-idf # Recommended for BLE stability

# Enable ESP32 Bluetooth Low Energy Tracker
esp32_ble_tracker:
  scan_parameters:
    # Active scanning for enhanced device discovery
    active: true

# Enable Home Assistant Bluetooth Proxy
bluetooth_proxy:
  active: true

# Configure external component source
external_components:
  - source: github://NicoIIT/esphome-ble_adv_proxy

# Initialize ble_adv_proxy component
ble_adv_proxy:
  # Default configuration

(...)
- Save configuration
- Select wireless installation
- Wait for installation completion (minimum 2 minutes)
Verification
- Monitor installation progress in real-time
- Access debug interface at
http://esp32-ble-adv-proxy.local - Verify data generation in debug interface
For installation issues, check the installation logs for error messages.
Now that the ESP32 part is ready, let’s return to the main Home Assistant setup.
Part 2: Home Assistant
Installing Home Assistant
Implementation Steps
Install Home Assistant Core directly on MacOS using Python. Note: This implementation is not compatible with Docker-based Home Assistant installations. See Q&A for details.
For alternative installation methods, refer to the official documentation.
Configuration
- Initialize Python virtual environment:
$ python3 -m venv .
$ source ./bin/activate
- Install Home Assistant Core:
$ pip3 install homeassistant==2025.4.4
- Create configuration directory:
$ mkdir config
- Launch Home Assistant:
$ hass --config config
Verification
- Access Home Assistant dashboard at http://localhost:8123
- Complete initial account setup
For installation issues, refer to the official documentation.
ESP32 Integration
Implementation Steps
Add ESP32 device to Home Assistant dashboard.
Configuration
Home Assistant should automatically discover the ESP32 device. If not, proceed with manual integration:
- Navigate to
Settings > Devices & Services - Click ADD INTEGRATION
- Search for ESP Home
- Enter device address:
esp32-ble-adv-proxy.local - Complete integration using ESP Home API Key
Verification
- ESP32 device and Bluetooth services appear in
Devices & Services - Device status shows as connected
Troubleshooting
- Integration failure:
- Verify ESP32 accessibility at http://esp32-ble-adv-proxy.local
- Check ESP Home service status
- API Key retrieval:
- In ESP Home device card, click ···
- Select Show API Key
For additional help, refer to the official documentation.
Home Assistant Community Store Installation
Implementation Steps
Deploy HACS integration in Home Assistant.
For detailed instructions, visit the official documentation.
Configuration
- Ensure
wgetis installed - Execute installation command:
$ wget -O - https://get.hacs.xyz | bash -
- Restart Home Assistant
- Navigate to
Settings > Devices & Services - Click ADD INTEGRATION
- Search for HACS
- Complete GitHub authentication
- Finalize installation
Verification
- HACS appears in Home Assistant navigation menu
For configuration issues, refer to the official documentation.
Installing ha-ble-adv
Implementation Steps
Deploy the custom repository ha-ble-adv through HACS.
Configuration
- Access Home Assistant HACS interface
- Click ··· in top-right corner
- Select
Custom repositories - Add repository:
https://github.com/NicoIIT/ha-ble-adv
Verification
- Installation completes successfully
- BLE ADV appears in
Settings > Devices & Servicesintegration list
For repository installation issues, refer to the official documentation.
Bluetooth Light Integration
Implementation Steps
Configure ha-ble-adv for Bluetooth light control.
Configuration
- Navigate to
Settings > Devices & Services - Click ADD INTEGRATION
- Search for BLE ADV
- Select “Duplicate Paired Phone App Config”
Verification
- Integration completes successfully
- Bluetooth light appears in Home Assistant Overview
- Direct control available through Home Assistant interface
Troubleshooting
- Installation guide inaccessible:
- Manually load
ble-advcomponent - Edit
config/configurations.yml:
- Manually load
# config/configurations.yml
...
ble_adv:
- Restart Home Assistant
- Retry integration
- Bluetooth communication issues:
- Verify ESP32 online status in ESP Home
- Check debug interface at http://esp32-ble-adv-proxy.local
- Additional issues: Refer to FAQ
HomeKit Bridge Integration
Implementation Steps
Configure HomeKit Bridge for iPhone Home app integration.
For detailed instructions, refer to the official documentation.
Configuration
- Navigate to
Settings > Devices & Services - Click ADD INTEGRATION
- Search for Apple
- Add HomeKit Bridge
- Open iPhone Home app
- Scan QR code from Home Assistant notification
- Select “Add Anyway” for uncertified accessory
Verification
- Bluetooth light appears in iPhone Home app
- Control available through Home app and Siri
Troubleshooting
Device Not Found After Scanning
Primary cause: Network configuration issues. Follow these verification steps:
- Verify mDNS functionality:
$ dns-sd -B _hap._tcp local
Expected output:
Timestamp     A/R    Flags  if Domain     Service Type     Instance Name
 0:29:39.244  Add        3  10 local.     _hap._tcp.       HASS Bridge xxxxxx
- Enable debug logging:
logger:
  default: warning
  logs:
    homeassistant.components.homekit: debug
    pyhap: debug
- Restart Home Assistant
- Retry device addition
- Check error logs for specific issues
Additional Network Verification
- Install “Discovery - DNS-SD Browser” on iPhone
- Verify local domain:
- Check
_hap._tcpexistence - Verify
HASS Bridge xxxxxxpresence
- Check
Network Configuration
- Verify network connectivity:
- Ensure iPhone and MacOS on same network
- Check firewall settings:
- HomeKit Bridge port:
21063 - mDNS port:
5353
- HomeKit Bridge port:
- Verify router configuration:
- Ensure mDNS not disabled
Additional Resources
- Official HomeKit Troubleshooting
- HomeKit Bridge Docker Guide
- Docker HomeKit Integration
- HomeKit Troubleshooting Guide
- Docker HomeKit Issue
- MacOS Docker Configuration
Summary
This tutorial demonstrates the integration of Bluetooth-enabled lights into Apple’s HomeKit ecosystem using open-source tools. The implementation utilizes an ESP32 development board with esphome-ble-adv-proxy for Bluetooth communication. Home Assistant Core on MacOS manages device integration, while the ha-ble-adv custom component enables Bluetooth light control. The HomeKit Bridge facilitates iPhone Home app integration, enabling control through both the Home App and Siri. The guide includes comprehensive troubleshooting procedures, particularly for mDNS network issues in HomeKit integration.
Q&A
Q1: Docker Compatibility
Question: Can Home Assistant run in Docker?
Answer: Yes, but with limitations. Reference implementations:
Known Issues:
- HomeKit connection failures
- mDNS network detection issues
- Incompatibility with host Bluetooth functionality
Q2: MacOS Bluetooth Integration
Question: Can MacOS built-in Bluetooth be used instead of ESP32?
Answer: Currently not supported for two reasons:
- Docker limitations prevent host Bluetooth access
- MacOS Bluetooth implementation doesn’t meet
ble-advrequirements
Q3: Home Assistant Service Management
Background Service Script:
#!/bin/bash
source bin/activate
nohup hass --config config > hass.log 2>&1 &
echo "Home Assistant started on: http://localhost:8123"
Service Management:
- Add execution permission:
$ chmod +x run.sh
- Start service:
$ ./run.sh
- Monitor logs:
$ tail -f hass.log
- Stop service:
$ pkill -f "hass --config config"
References
- Home Assistant
- Home Assistant Community Store
- ha-ble-adv
- ESP Home
- esphome-ble-adv-proxy
- ESP Home Installation Guide
- ESP Home Installation Troubleshooting
- ESP Home Home Assistant Integration
- Home Assistant MacOS Installation
- Home Assistant HomeKit Integration
- Home Assistant HomeKit Troubleshooting
- HACS Documentation
- HACS Configuration Guide
- HACS Custom Repositories
- ha-ble-adv FAQ
- HomeKit Bridge Docker Guide
- Docker HomeKit Integration
- HomeKit Troubleshooting Guide
- Docker HomeKit Issue
- MacOS Docker Configuration
Service URLs:
- ESP Home Dashboard: http://localhost:6052
- Home Assistant Dashboard: http://localhost:8123